
So you have authenticated user traffic you want to cache? Good - you’re on the right post. This post is a walk through for caching content for authenticated users in Drupal 7. We will be using the Authcache suite of modules. If you haven’t read it yet, I strongly recommend you check out my last post, Authenticated User Caching Concepts in Drupal 7.
Our goal is a simple authenticated user caching system based on Authcache’s AJAX implementation, with a Memcached backend. We will serve pages out of Drupal’s own page cache, with placeholders for any content which could be customized to the logged in user. The user’s browser will make a second call to the web server for the content that belongs in those placeholders. Whenever possible, the placeholders will be filled from browser cache or data stored in memcached. By the end of this post, we’ll have a frontpage which loads for authenticated users without ever hitting the database.
Install Authcache
First you will need to set up a local installation to follow along. Set up an environment for Drupal 7 with memcached running. You can set up your own vanilla D7 site to work with - just create some devel content, an interesting panels-and-views based frontpage, and set up memcached. You can also use this ready-to-go drush archived Drupal site. Note that this is a rather large site; I like to generate 16,000 nodes or so so I can really feel the difference between a cached return and a live one. Apart from all those nodes, it has:
- Drupal 7-latest
- Drupal’s Memcache module. (Make sure your environment has memcached set up!)
- A bunch of devel-generated content
- A bunch of other handy modules for generating a faux-frontpage
- Drupal’s Authcache module
- The caching-relevant portion of settings.php in a separate file called settings.caching.php.
Install the Authcache module per usual, along with the following other modules:
- Authcache AJAX
- Authcache Block
- Authcache Builtin Storage Backend
- Authcache Debug
- Authcache Form
- Authcache Page Manager
- Authcache Panels
- Authcache Panels by Page Manager
- Authcache Personalization API
- Authcache Views
That’s a lot of modules, because znerol has done a great job of compartmentalizing functionality. This is complicated stuff, and the less of it you have to enable, the better!
When you enable the modules, you’ll get a message complaining that you don’t have the cache backend configured yet. Add these two lines to your settings.php to let Drupal know about the Authcache backend:
$conf['cache_backends'][] = 'sites/all/modules/authcache/authcache.cache.inc';
$conf['cache_backends'][] = 'sites/all/modules/authcache/modules/authcache_builtin/authcache_builtin.cache.inc';
Now your site is prepared to deliver cached content to authenticated users. Now comes the first scary bit: disable Drupal’s built in page caching from admin/config/development/performance .
Configure Authcache
Now that you’re set up to deliver cached content to authenticated users, we can get to the fun part: configuring. Unlike Anonymous user caching, in order to cache content for authenticated users we actually need to let our caching system know a little bit about the various components of a given page. The front page of the demo Drupal site you downloaded is a reasonably complicated one. Panels with Views and Quicktabs, including several blocks which are unique to each user. We have to go through each element which could be customized to a user, and set an authcache policy on it.
As we proceed, you will notice a little red button which has appeared in the top left corner of your browser window.

This is Authcache Debug: a helpful little block which tells you if the page was delivered from cache, or if an element on there is still preventing the page from being cached. If you’re logged in as admin, you’ll notice that it says the page has been excluded of cache, because “Caching disabled for superuser”. So in order to test this properly, you’ll have to create another user account to keep open in a separate browser window. Go ahead and do that now.
Once you’re logged in as a user who SHOULD be seeing cached content, that Debug block will start coming in handy. Visit the frontpage as your test user, and note that it goes yellow (meaning it’s cacheable, but it wasn’t in cache yet), and then green on a reload. On that reload you’ll see Cache Status “HIT”, and a few helpful statistics about the page’s normal render time (460.17ms for me) vs its cached render time (3.85ms).
Technically I can end the guide here. My work here is done! You’re caching content for authenticated users!
Customizing content for cached, authenticated users
If you try logging in as yet ANOTHER user, you’ll start to notice some things which are a bit odd. For starters, that “random post” quickab is serving the same post every time. And once one user creates a node, and it is listed in the “Your posts” quicktab, that node is listed for EVERYONE in the “your posts” quicktab. This is because all we’ve done so far is enable caching for authenticated users. Apart from the handful of page components which Authcache can detect and handle out-of-the-box (which we’ll get to in a moment), everything is just being statically cached. One cache for every user, just like anonymous users get.
That’s not what we signed up for. Some elements on the page actually need to be cached separately, on a per-user basis. Some of them should never be cached at all. Remember all those authcache modules we saw a moment ago? What are they doing, picking their noses?
Actually, some of those modules are already working for you. The most notable is authcache_form, which jumps into every Forms API based form - that is to say, all of them - and replaces the form token with a placeholder. The token gets filled in by AJAX after the rest of the page loads from cache. Authcache_comments works invisibly, too.
For the page elements which are less predictable than forms, authcache modules offer you, the administrator, a way to identify the elements which need special handling and set how they should be handled. So to get the rest of the page working properly, We have to identify a handful of page elements which need separate caching behavior from the rest of the frontpage.
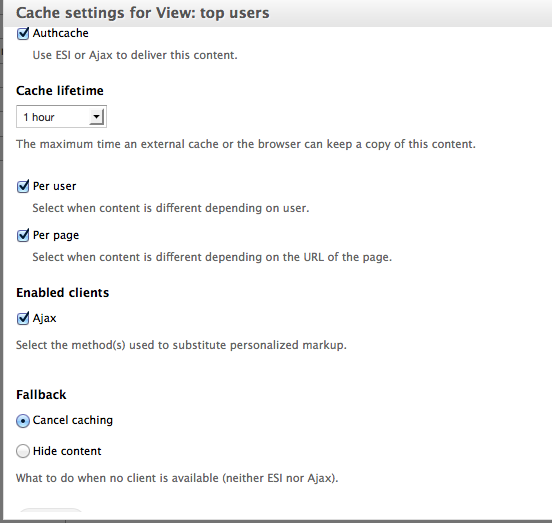
Working from the top of the page downwards, first we’ll deal with that “Your posts” quicktab. Edit the View which generates that block, at admin/structure/views/view/posts/edit/block_2 . If you expand the “Advanced” section on the right, you’ll see that we have an “Authcache” section now! Open it up, and enable the “authcache” checkbox which appears. Now you have a wealth of options for caching just this View.
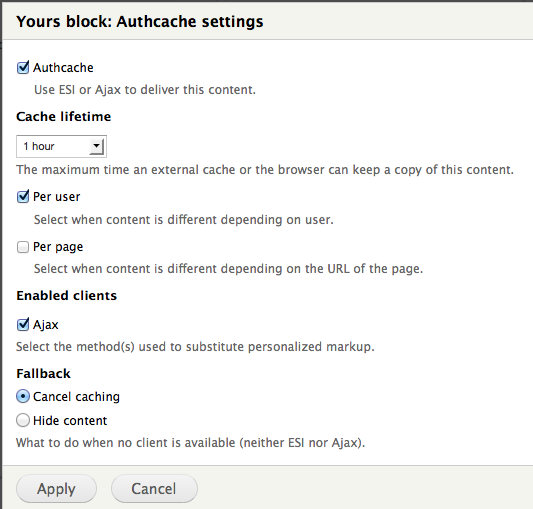
Note that just because it’s customized per user doesn’t mean it shouldn’t be cached! We can cache this fragment for about an hour before running that query again. Once we save the View and clear caches, if you return to the frontpage you’ll find that each user gets their own “Your posts” block. Success!
The next block over in the quicktab, Random Post, is a little trickier. This one we want to change as often as possible. We could follow a similar approach to what we just did, and in Views’ authcache settings just set a cache lifetime of 0. But in most cases this isn’t necessary. On a truly high performance site, you should cache EVERYTHING, even if only for a few seconds. A cache lifetime of 5 or 10 seconds is usually short enough that users won’t notice it; but your server will. For a block which appears on every page of the site, a 10 second cache lifetime can mean it only has to actually query and compute once when a user clicks through 3 links to find the content he wants. This is a sort of microcache, and it can save you CPU cycles. For this block, let’s set a cache lifetime of 10 seconds. Set cache lifetime to “Custom”, and enter 10 seconds into the field which appears. This one does not have to be cached per user; it can be global.
You should apply these same tricks to all three blocks on the sidebar: users like you, recent comments, who’s online, and who’s new. But for the sake of practice, I’ll show you a couple of different ways to get to that Authcache setting.
You can find it in the Panels Content admin screen (thanks, authcache_panels!).
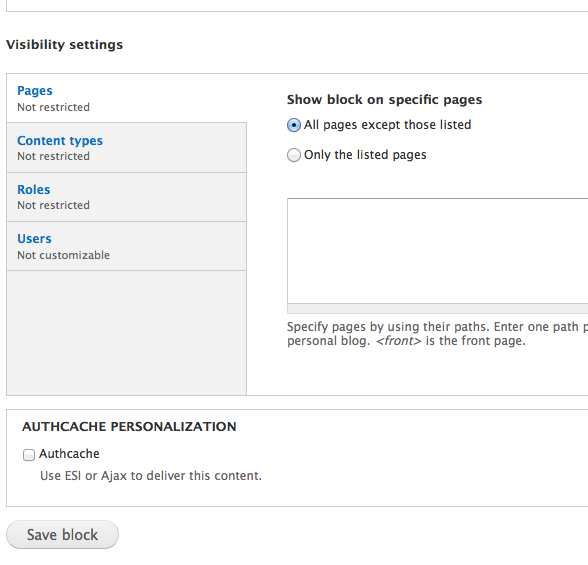
You can find it on the Block configuration page (thanks, authcache_block!).
(note: on the Demo site these are not positioned as blocks; they are positioned by panels. That means they don’t go through blocks’ normal render process, which means that authcache_block would be useless here!
Following this process you can deliver the frontpage to users, while only asking Drupal to generate one or two objects.
Avoid the DB entirely
The last step, once you have the page behaving the way you want, is probably my favorite. It is possible to have Authcache deliver pages without EVER hitting the database! In order to get this going, you need to make sure that all the information Authcache needs about your caching configuration is available either in settings.php, or in memcached. We also ned to tell Authcache to attempt building the page without a DB connection. This is surprisingly easy. With memcached already set up, we just need to add the following to settings.php
// Authcache should try to serve from cache without connecting to the DB.
$conf['authcache_builtin_cache_without_database'] = TRUE;

// Cache settings that are usually set in the 'performance' admin UI.
$conf['page_compression'] = 1;
$conf['page_cache_maximum_age'] = 600;

// Tell Drupal that authcache keys should be stored in Memcached.
$conf['cache_class_cache_authcache_key'] = 'MemCacheDrupal';

// Tell Drupal that page cache should be stored in Memcached.
$conf['cache_class_cache_page'] = 'MemCacheDrupal';
That’s actually all there is to it. BAM! You’re serving your frontpage without ever touching the DB.
Troubleshooting/Going deeper
Some pages come up with a red light in Authcache Debug.
That’s normal. There are all sorts of situations in which you would not want to cache a page. If one of your test users creates a node and then visits that new node, you will notice just such a red light.
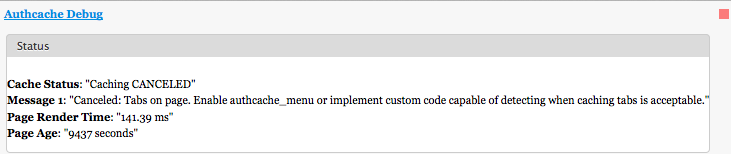
Authcache Debug is your best friend here. Sometimes this is something simple, like in this example. All we need to do is enable authcache_menu, and this will turn green. Other times the problem is deeper. Perhaps there is a page element which needs a caching mechanism defined. Or perhaps a fragment that you have set to use ESI, isn’t visible for the ESI tags to be evaluated.
It is also worth noting that authcache_debug is not infallible. There are definitely situations where it gets it wrong. Ultimately the best way to tell for certain is to open up your browser’s developer tools and look at the Cache-Control headers yourself.
That “random” block and the “user” block change on every page load! I thought I set a 1 hour cache lifetime on those. What gives?
Authcache doesn’t actually keep a cached copy of these fragments. It simply sets the Cache-Control header on the fragments to let any external caches know that it’s OK to cache the fragment for a certain amount of time. Many web browsers respect this and will avoid the extra request. But even if your browser doesn’t for some reason (it’s in anonymous mode, or you have cache disabled because you’re a developer, dammit!), there are other proxies that you can set up to see this in action. Varnish and NGINX will both normally respect the Cache-Control directive, so these fragments will not come from Drupal.
It still seems like I’m bootstrapping Drupal an awful lot… What else can I do?
One of the cool tricks that comes with Authcache is a separate front controller. This is an alternative to Drupal’s own index.php which handles normal page requests. The authcache front controller is much lighter weight, and can make direct calls to the DB without a full Drupal bootstrap. All of the authcache modules are designed to work well with it.
To set up the frontcontroller, simply copy sites/all/modules/authcache/modules/authcache_p13n/safe_frontcontroller/authcache.php to your site’s root directory. Then add the following line to settings.php :
$conf['authcache_p13n_frontcontroller_path'] = 'authcache.php';
This is actually recommended for most installations, not only because it makes the URL for fragments shorter; but it also saves some $_SERVER key rewrites which can cause problems.
Caching ALL the things
Authcache comes with a pretty sensible set of defaults as far as which pages should be cached. But you may want to tweak them. For example, you may want to exclude search result pages from caching. You can control this at admin/config/system/authcache/pagecaching .
But what about (obscure problem X)
Fixing obscure problems is not what blog posts are good at. They are good at showing you a basic method that will work in a lot of cases, or at least will teach you the fundamental concepts. The issue queue for Authcache is active, and extremely well maintained. I can’t remember the last time I encountered such an active module maintainer as znerol. Check it out!
But in case that doesn’t help, the next blog post in this series is going to talk about advanced topics in authenticated user caching: expire module integration, ESI vs AJAX, stripping form tokens, and my favorite: planning a layered caching architecture for your site! See you then!